
What is Flavor
Flavors are just comfortable. They let you define some build configurations and switch them as you want. For example, you could have one flavor for development, and one for production. You can set different URLs for API calls or different icons and app names. With a click, you’re ready to develop or release your great application.
We use a lot of flavor configurations, not only for comfort but also to be sure to deploy the right version of the app. We just set different icons and sometimes even app themes to be sure not to release an app with an API URL pointing to local or staging machines. That would be very dangerous and shameful.
Usually, we use from 3 to 5 different flavors per app (development, production, staging, demo..)
Flavors in Flutter
When it comes to Flutter, flavors are easy to implement, but if you don’t know android flavors and iOS schema you can have some problems. I used to use android buildConfigs and iOS targets and so it was not so straightforward.
Flutter cli has an option for flavors, so you can run/build your app using flavors:
flutter build --flavor developmentThese are mapped to android product flavors and iOS schema.
The approach for this tutorial
I am going to build a sample app with two flavors: dev, prod.
Step 1: Initialize a default flutter app
Run flutter create flavor_test to create a default flutter project. Nothing fancy.. this is the first commit of the sample app.

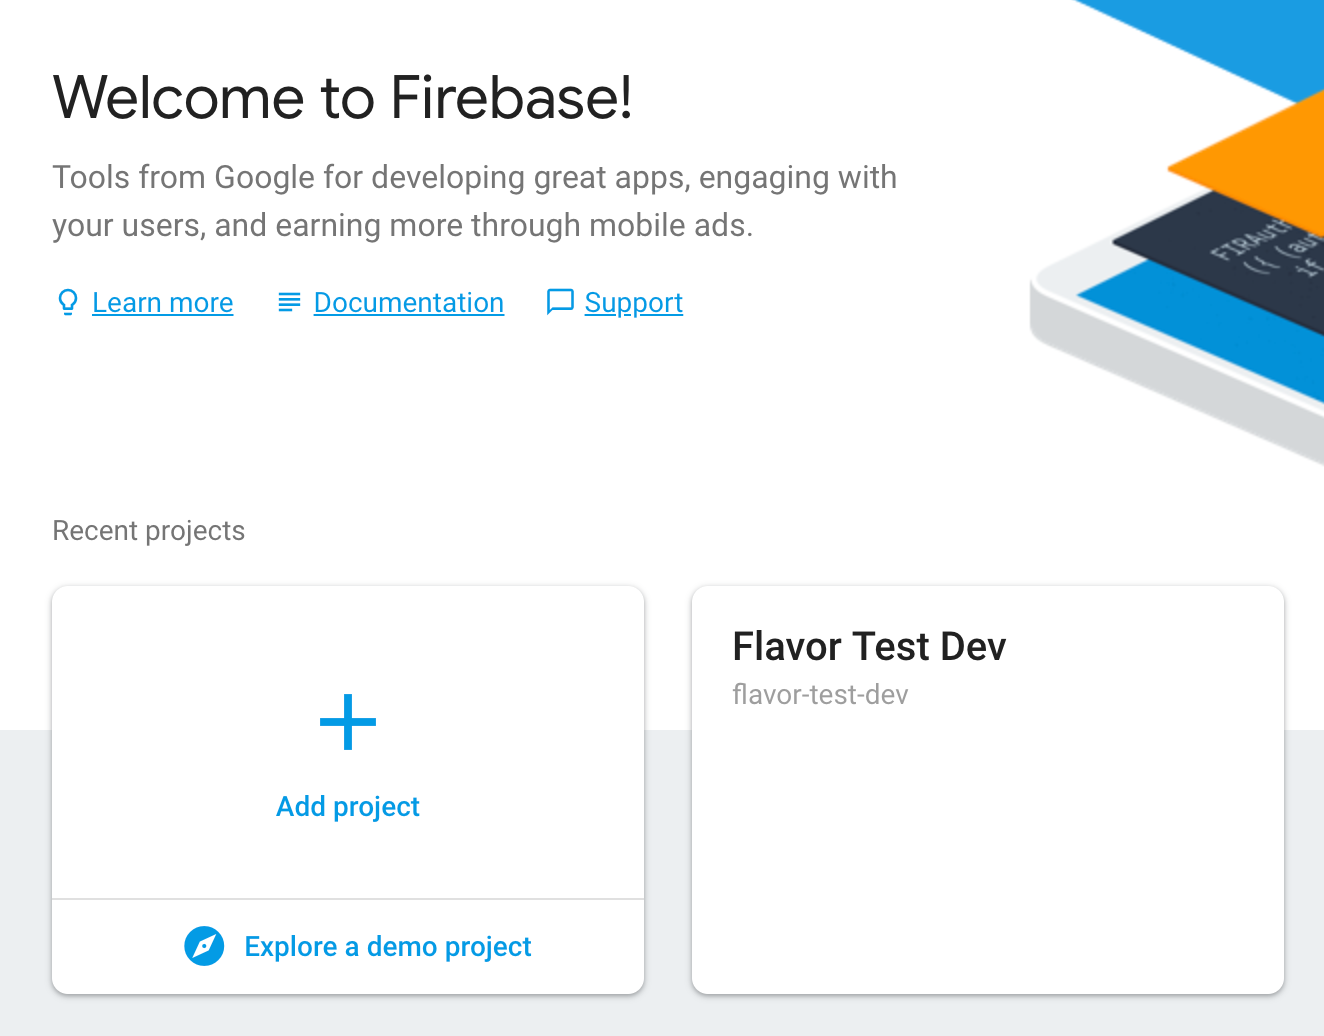
Step 2: Configure the app to connect to Firebase
An XCode peculiarity for Android guys:
You’ll have to add the ios file through XCode, as the project file does not detect it if you simply copy it to the ios/Runner directory via the command line. Drag and drop it in the Runner folder in XCode, and select all targets. I learned this only while I was writing this tutorial, so thought it might be helpful to someone setting this up from scratch.
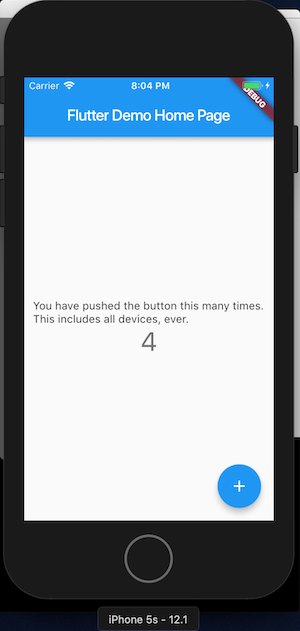
In this step, I have also updated the main.dart file to store the counter in the Firebase Realtime DB instead of just locally. Make sure you set up the Firebase Realtime DB via the console and add security rules to allow write access.
This is what the app looks like after this commit -
You can look at the commit diff here to see what all changed —
Code Diff : Step 1 to Step 2https://github.com/animeshjain/flavor_test/compare/step_1_init...step_2_firebase
Step 3: Adding build flavors to Android
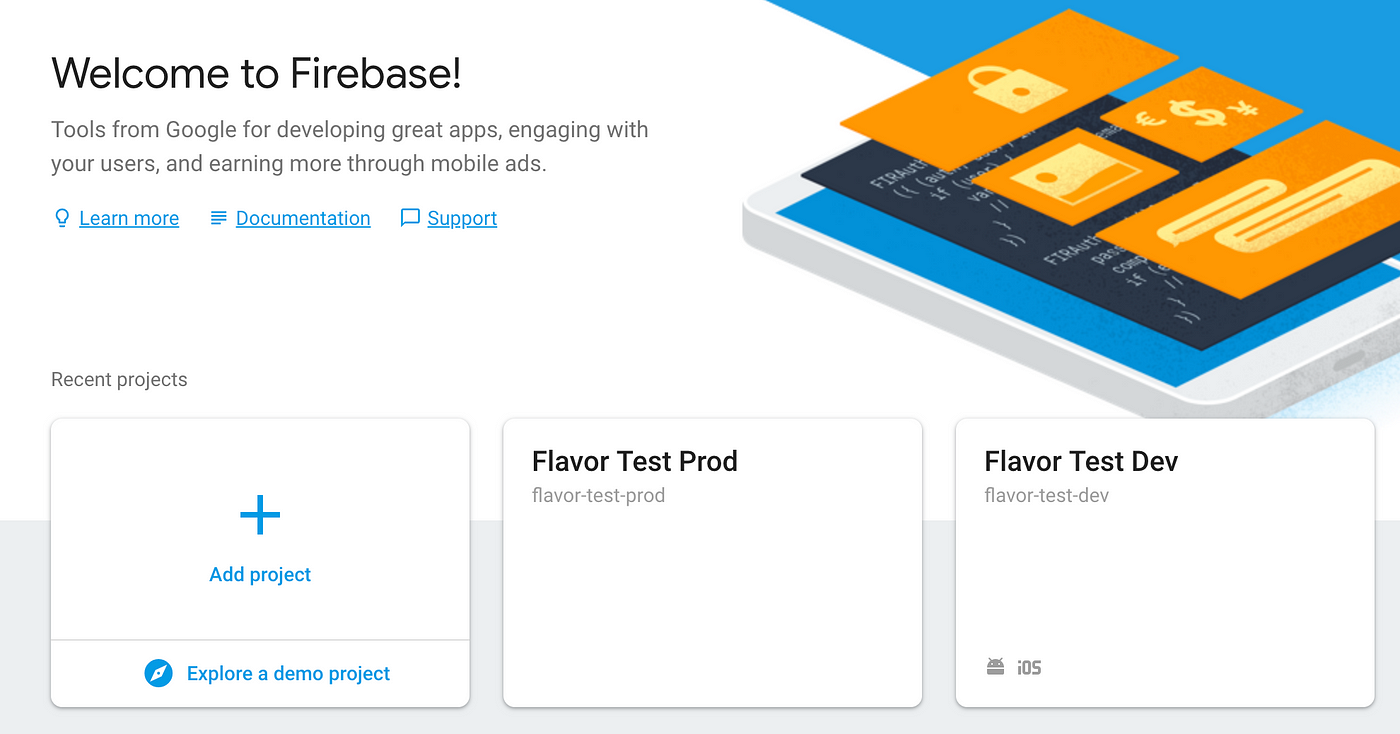
The current Firebase project we created was for our dev environment (it was named as such as well), and now we want to create a flavor which will be for our prod environment.
So we can create a new Firebase project for the prod environment
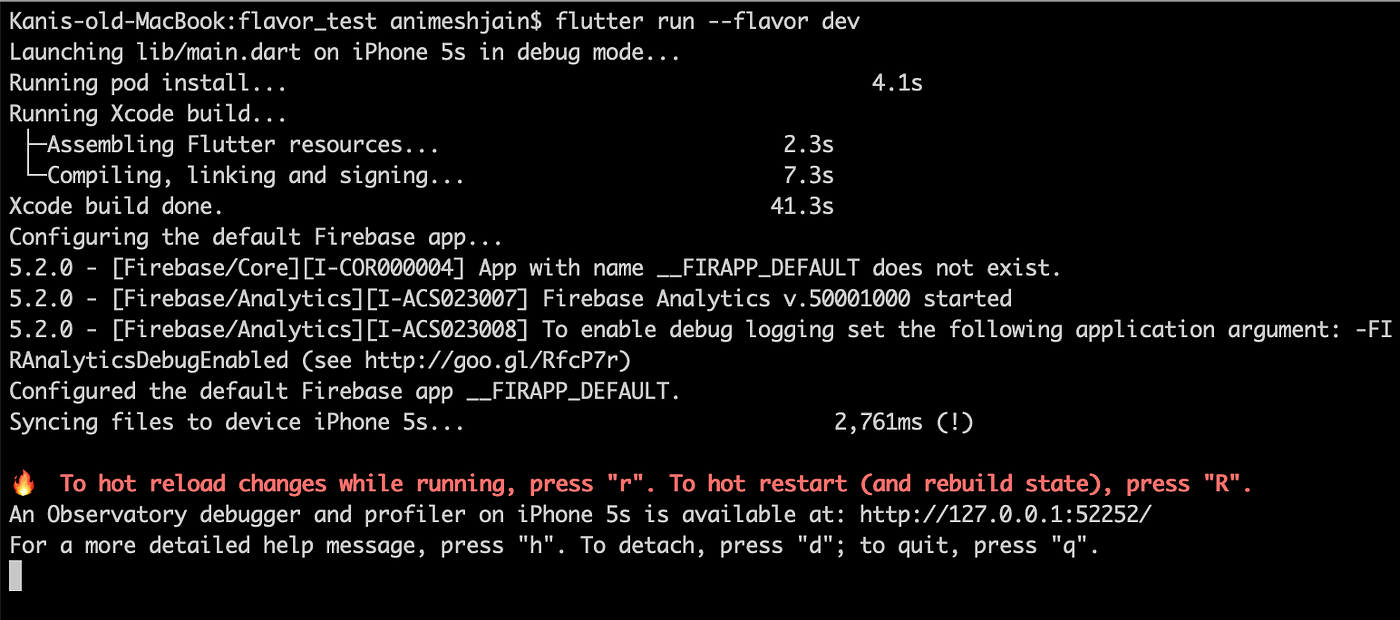
google-services.json file and keep it handy. We will shortly add it to our app.For kicks, let’s just see what flutter says when we try to run our app using the
--flavor flag.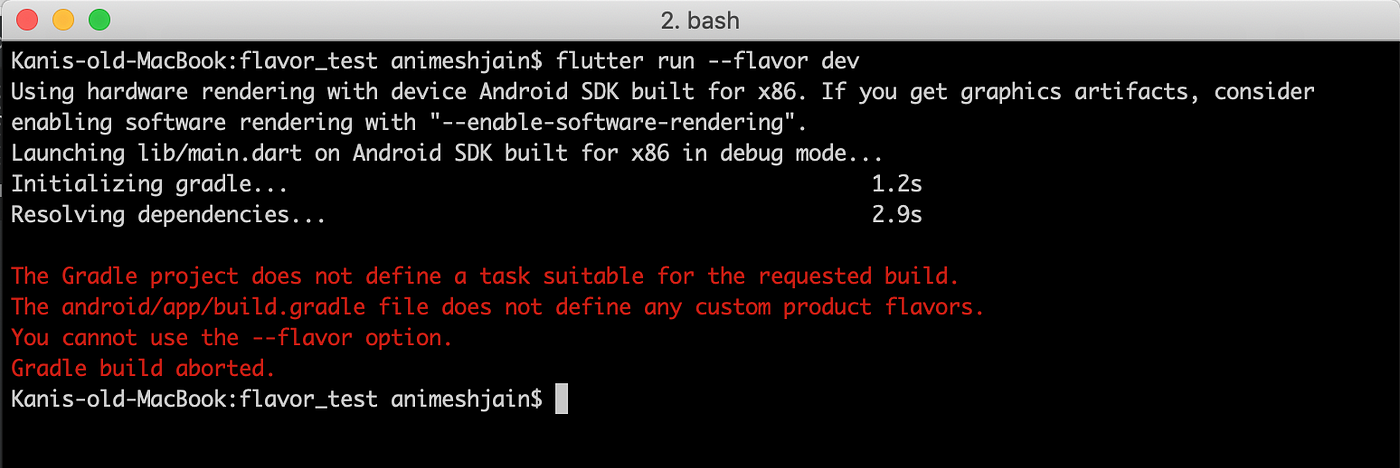
We add flavors to app/build.gradle and it looks something like this
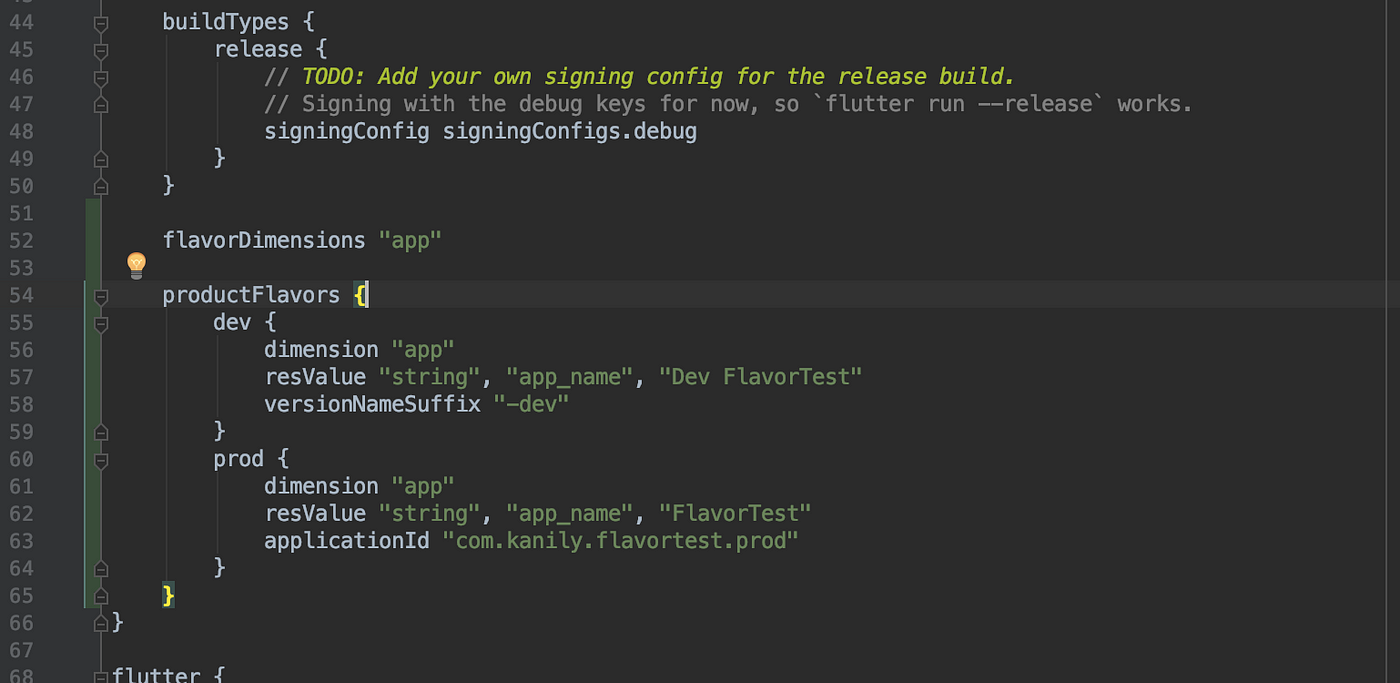
applicationId as com.kanily.flavortest and the prod flavor will use the flavor specific applicationId as defined in the prod flavor definition com.kanily.flavortest.prod. We have also defined a string resource called app_name which we are using in the AndroidManifest.xml instead of hard coding the app name. Finally, regarding the google-services.json, it can be put under the source folder within subfolders with names matching the flavors. From Firebase Docs -
So these settings take care of
- Different app id’s for different flavors, so that all flavors can be installed simultaneously on the device
- Different application names for different flavors, so that users/testers/developers can easily differentiate
- Each flavor pointing to its own Firebase project (this is automatically taken care of by the convention of placing the files in folders names the same as flavors)
Now you can run the app using the commands
flutter run --flavor dev or flutter run --flavor prod
Both apps can be installed on the device now and they can run in parallel.
Notes: For simplicity, I have removed the profile and release directories which were there in the default flutter scaffold project. They were only adding the Internet Access permission via AndroidManifest.xml, which I have added to the main file.
Here is the code diff to see what all changed —
Code Diff : Step 2 to Step 3https://github.com/animeshjain/flavor_test/compare/step_2_firebase...step_3_android_flavors
Step 4: Adding build flavors to iOS
iOS flavors are going to be more nuanced to setup. Also, iOS configuration is mostly done using the XCode UI and not by editing config files in a text editor😱, it is quite messy to explain by typing words. But I have you covered, to help with understanding I’ve recorded all actions and embedded the screencast gifs. So have a glass of water and buckle up…
Let’s just start with running the flutter run command targeting an iOS device/simulator and see what happens
flutter run --flavor dev
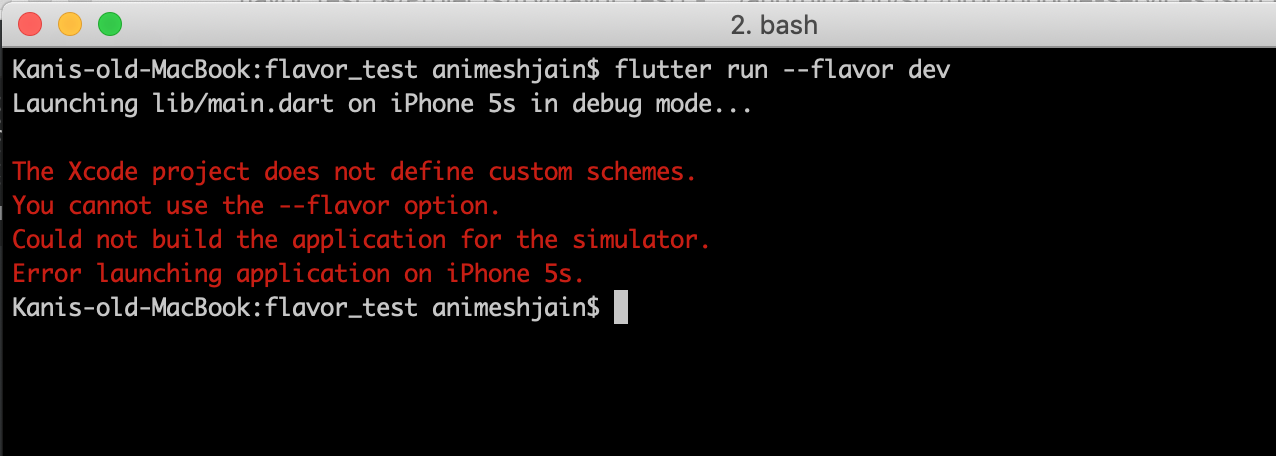
ios/Runner.xcworkspace
And then, here’s how to setup a custom scheme called dev…
Now running flutter run --flavor dev again…

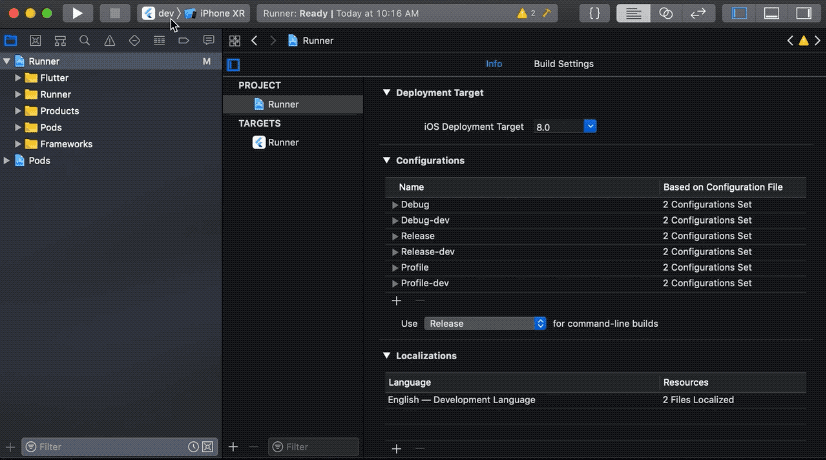
So the error message tell us that Flutter expects a build configuration by the name of Debug-dev or similar. Let’s create these build configurations…
Trying flutter run --flavor dev again…
So this worked. But right now we have not customized anything in the build scheme / build configuration, so the app is running with the same configuration as it was earlier. Let’s rename the default build scheme and build configurations to prod.
Since we duplicated the build configurations, the dev ones are still connected to the original scheme (which we have now renamed to prod). Lets fix that as well…
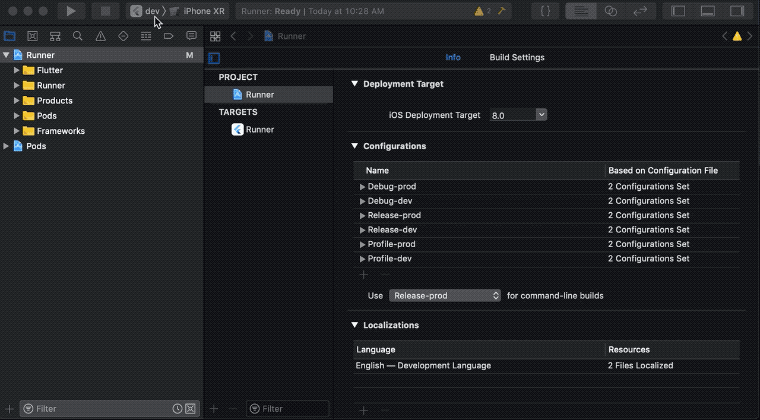
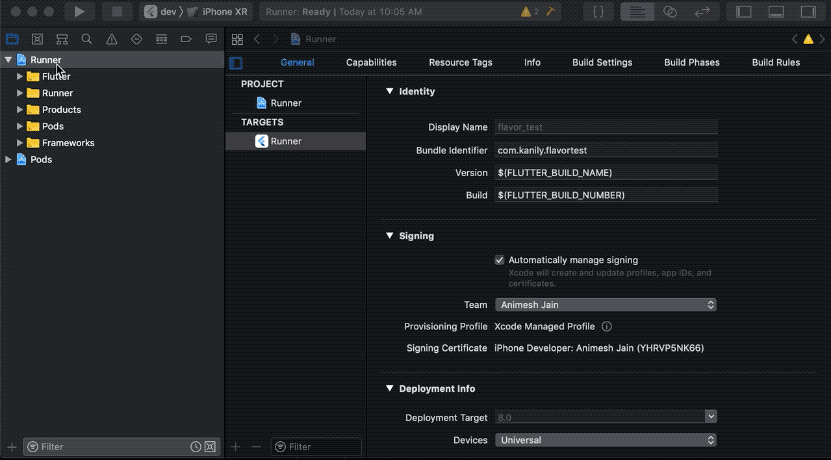
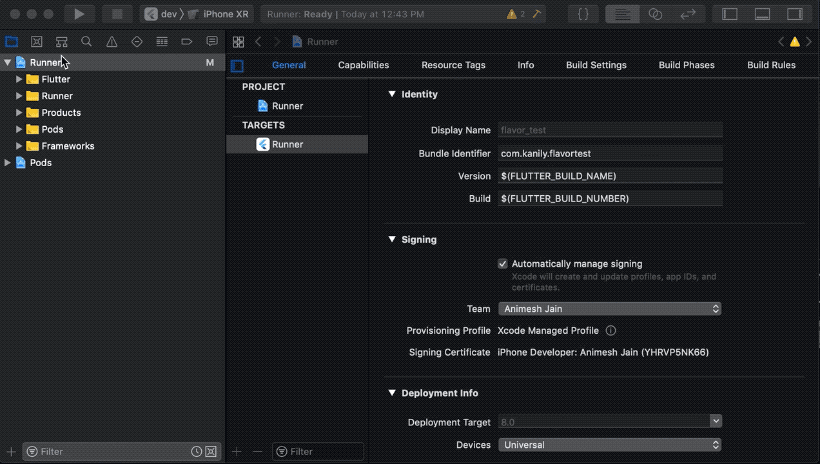
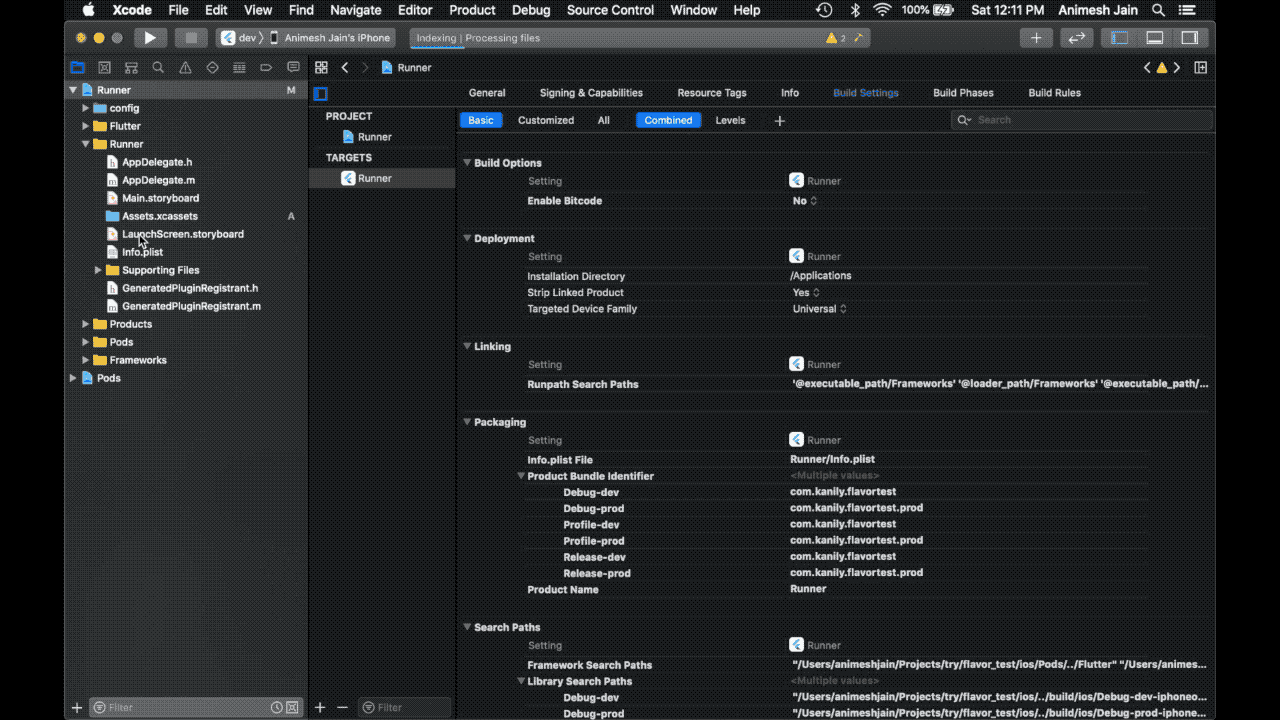
Now we have two schemes connected to their own build configurations. We can now customize things per scheme. Let’s first change the app bundle identifier to be different for both schemes. Our prod applicationId in Android was com.kanily.flavortest.prod, bundle identifier in iOS is parallel to the applicationId in Android. So let’s change our prod bundle identifier to com.kanily.flavortest.prod…
We would also like to use different Display Names for the app. However, the Display Name parameter is not there in the Build Settings for the target, so we simply make a user defined parameter, and use it instead…
[UPDATE May 5, 2020. Thanks to Stanford Lin for the comment]
There has been a change in how Flutter ios build works now, and this video is a bit outdated. You will probably get an error that says
Could not find the built application bundle at build/ios/iphoneos/Runner.appTo avoid this error, instead of adding the `$(APP_DISPLAY_NAME)` to the Display Name property in General Settings tab, you should update your Info.plist file to include a new property
<dict>
...
<key>CFBundleDisplayName</key>
<string>$(APP_DISPLAY_NAME)</string>
...
</dict>
You do not need to change the Display Name property in General Settings tab any more.

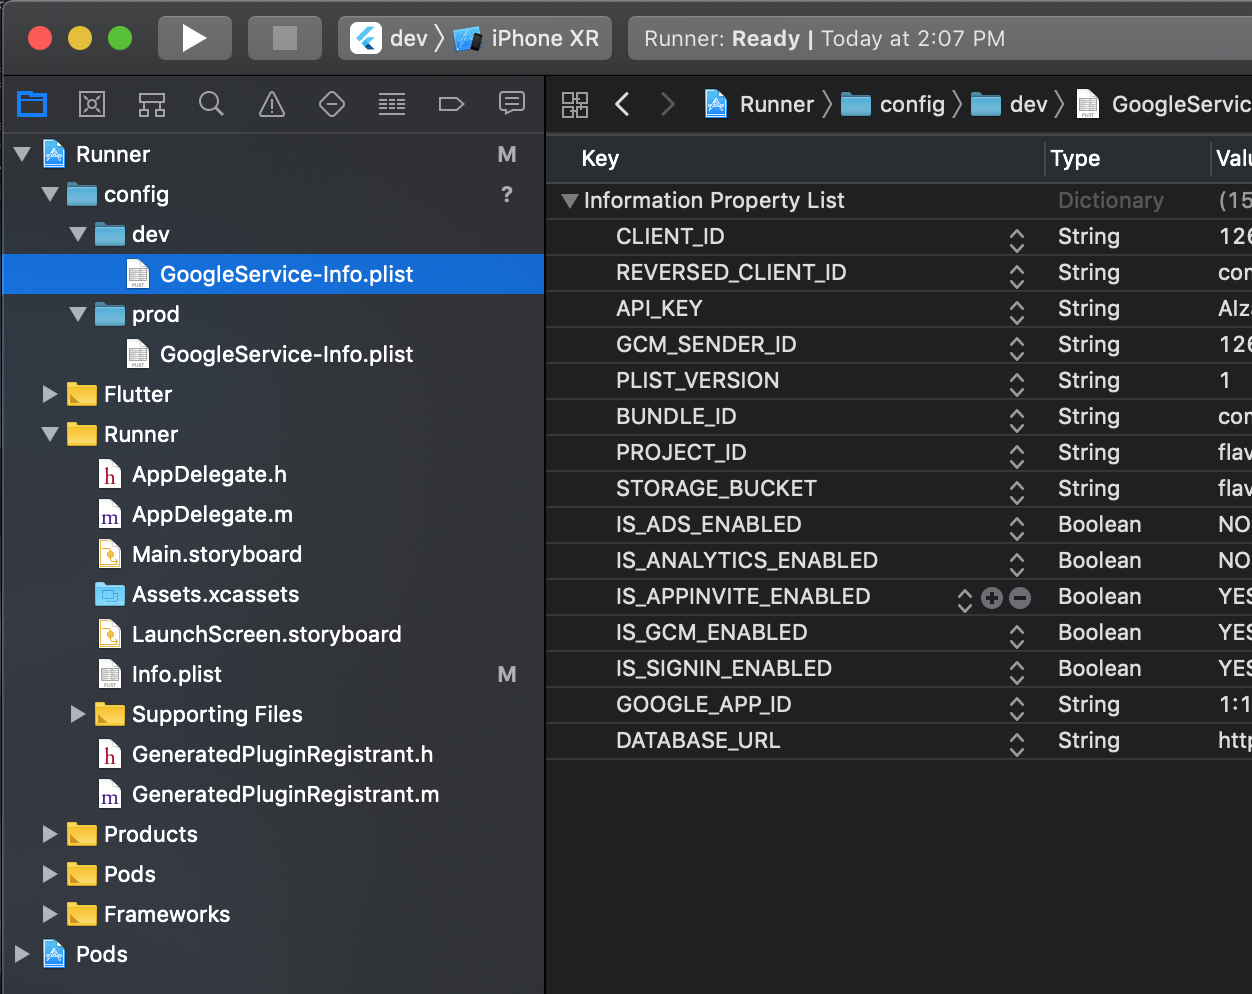
GoogleServices-Info.plist based on the build configuration. There are some solutions which suggest doing this at runtime on app startup, basically initializing Firebase by explicitly specifying which config file to use (the Firebase docs suggest the same — https://firebase.google.com/docs/projects/multiprojects). But I like the other option of copying the right file at the default location at build time, so that when the app bundle gets generated, it used the right file automatically.To achieve that, first we will keep the
GoogleServices-Info.plist files for each flavor in a separate folder like follows…
Make sure you drag and drop the config folder explicitly into XCode after copying it to the correct location from the command line or finder. XCode only adds it to it’s project reference after you add it explicitly. It does not pick up files/folders kept in the project directory by default. XCode folder structure after following the above steps looks like…
Now we need to figure out how to add a step in the build process so that the respective GoogleServices-Info.plist file is copied into the correct location, i.e. inside the Runner directory. This can be accomplished by adding a new Run script Build Phase to the target…

The script I used is below…
environment="default"

# Regex to extract the scheme name from the Build Configuration
# We have named our Build Configurations as Debug-dev, Debug-prod etc.
# Here, dev and prod are the scheme names. This kind of naming is required by Flutter for flavors to work.
# We are using the $CONFIGURATION variable available in the XCode build environment to extract
# the environment (or flavor)
# For eg.
# If CONFIGURATION="Debug-prod", then environment will get set to "prod".
if [[ $CONFIGURATION =~ -([^-]*)$ ]]; then
environment=${BASH_REMATCH[1]}
fi

echo $environment

# Name and path of the resource we're copying
GOOGLESERVICE_INFO_PLIST=GoogleService-Info.plist
GOOGLESERVICE_INFO_FILE=${PROJECT_DIR}/config/${environment}/${GOOGLESERVICE_INFO_PLIST}

# Make sure GoogleService-Info.plist exists
echo "Looking for ${GOOGLESERVICE_INFO_PLIST} in ${GOOGLESERVICE_INFO_FILE}"
if [ ! -f $GOOGLESERVICE_INFO_FILE ]
then
echo "No GoogleService-Info.plist found. Please ensure it's in the proper directory."
exit 1
fi

# Get a reference to the destination location for the GoogleService-Info.plist
# This is the default location where Firebase init code expects to find GoogleServices-Info.plist file
PLIST_DESTINATION=${BUILT_PRODUCTS_DIR}/${PRODUCT_NAME}.app
echo "Will copy ${GOOGLESERVICE_INFO_PLIST} to final destination: ${PLIST_DESTINATION}"

# Copy over the prod GoogleService-Info.plist for Release builds
cp "${GOOGLESERVICE_INFO_FILE}" "${PLIST_DESTINATION}"
For people who are using zsh instead of bash, you need to make a small adjustment to make the script run.
I had to wrap the script provided by the author with two lines. So the script becomes:
setopt KSH_ARRAYS BASH_REMATCH
<insert the author’s script>
unsetopt KSH_ARRAYSI got it from here. Thanks.
And with this, we should be done! Now we can run
flutter run --flavor dev or flutter run --flavor prod
And the iOS device / simulator will install separate apps which connect to separate Firebase DBs!
Code Diff : Step 3 to Step 4https://github.com/animeshjain/flavor_test/compare/step_3_android_flavors...step_4_ios_flavors
Step 5: Adding different app icons for different flavors
Sometimes just different names are not enough. You might want different app icons as well for a more clear visual distinction when multiple flavors are installed in a device.
So far I was using the default launcher icon that Flutter comes with, but to illustrate the steps I have create two icons for prod and dev.


- Steps for Android
Depending on which flavor you consider “default”, one of these icons can simply go to the android/app/src/main/res folder and replace the existing ic_launcher.png files for all the sizes. I’m going to put my dev icon into the default folder.

For the prod flavor, as some of you might have guesses, we will simply create a res folder in the prod folder, and add all size specific folders there. So your directory structure will look something like this
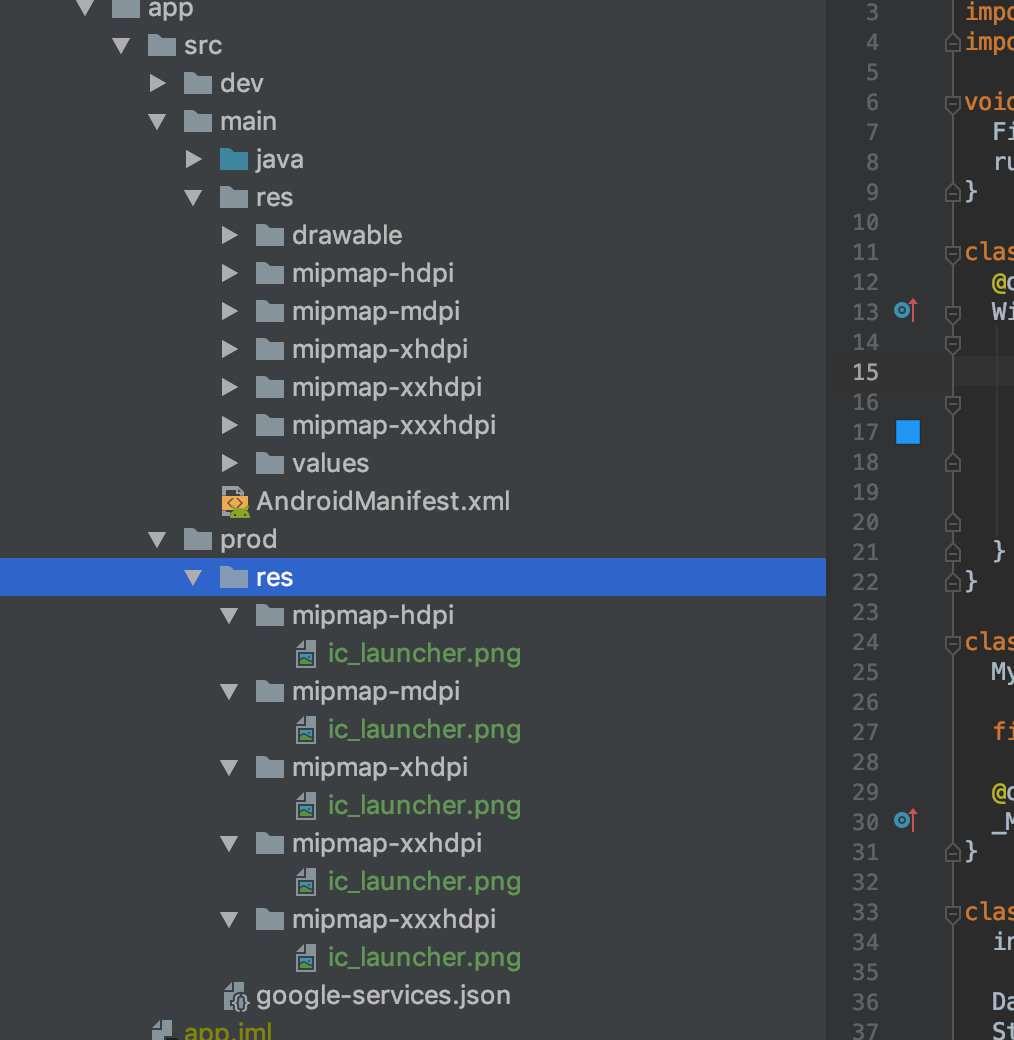
Note: You could have put your dev app icon files into the dev folder specifically as well. Android just looks into the flavor specific directory first, and if nothing is found there, then it falls back to the default directory called main and uses the resources found in that instead.
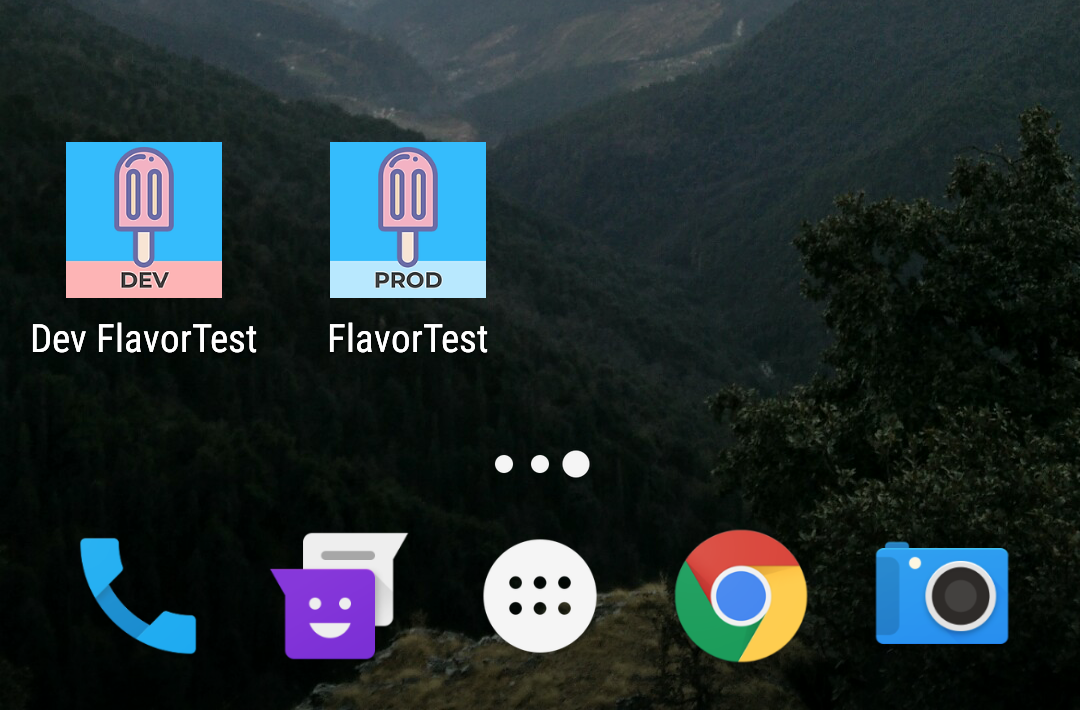
This is how the icons look on Android -
- Steps for iOS
We’ll jump back to Xcode for this one. We create app icon assets and then tell XCode to use different icons for different flavors. Check the gif…
Now when you build the app on iOS, you’ll get something like this -

Flutter Flavor With flutter_flavorizr Package
A flutter utility to easily create flavors in your flutter application
Side note: this tool works better on a new and clean Flutter project. Since some processors reference some existing files and a specific base structure, it could be possible that running Flutter Flavorizr over an existing project could throw errors.
Before running Flutter Flavorizr, you must install the following software:
These prerequisites are needed to manipulate the iOS project and schemes. If you are interested in flavorizing Android only, you can skip this step. Keep in mind that you will have to use a custom instructions set with Android and Flutter processors only, otherwise an error will occur.
Installation
dev_dependencies:
  flutter_flavorizr: ^2.1.2
You can install packages from the command line:
pub getOnce all of the prerequisites have been installed and you have added flutter_flavorizr as a dev dependency, you have to edit your pubspec.yaml and define the flavors.
flavorizr:
  app:
    android:
      flavorDimensions: "flavor-type"
    ios:

  flavors:
    apple:
      app:
        name: "Apple App"

      android:
        applicationId: "com.example.apple"

      ios:
        bundleId: "com.example.apple"

    banana:
      app:
        name: "Banana App"

      android:
        applicationId: "com.example.banana"
      ios:
        bundleId: "com.example.banana"
Usage
flutter pub run flutter_flavorizr
You can also run flutter_flavorizr with a custom set of processors by appending the -p (or --processors) param followed by the processor names separated by comma:
flutter pub run flutter_flavorizr -p <processor_1>,<processor_2>
Example
flutter pub run flutter_flavorizr -p assets:download
flutter pub run flutter_flavorizr -p assets:download,assets:extract
Run your flavors
Once the process has generated the flavors, you can run them by typing
flutter run --flavor <flavorName> -t lib/main-<flavorName>.dart
Example
flutter run --flavor apple -t lib/main-apple.dart
flutter run --flavor banana -t lib/main-banana.dart
Customize your app
Flutter_flavorizr creates different dart files in the lib folder. In the flavors.dart file we have the F class which contains all of our customizations.
class F {
  static Flavor? appFlavor;

  static String get title {
    switch (appFlavor) {
      case Flavor.APPLE:
        return 'Apple App';
      case Flavor.BANANA:
        return 'Banana App';
      default:
        return 'title';
    }
  }

}
The process creates simple title customization: a switch that checks the current appFlavor (defined in our app starting point) and returns the correct value. Here you can write whatever you want, you can create your custom app color palette, differentiate the URL action of a button, and so on.
If you are wondering how to use these getters, you can find an example under the pages folder: in the my_home_page.dart file, the page shown after the launch of the app, we can see a clear reference on the title getter defined in the F class.
Side notes
I haven't found yet a good groovy parser to guarantee the idempotency of the AndroidBuildGradleProcessor.
The only way to keep track of the autogenerated flavor dimensions is to mark up the beginning and the end of the section with magic comments.
Please do not erase these comments otherwise you will break down the AndroidBuildGradleProcessor.
Third-party services
Google Firebase
In order to flavorize your project and enable Firebase in your flavor
you have to define a firebase object below each OS flavor. Under the
firebase object you must define the config path of the google-services.json
(if you are under Android configuration) or GoogleService-Info.plist
(if you are under iOS configuration).
As you can see in the example below, we added the path accordingly
flavorizr:
  app:
    android:
      flavorDimensions: "flavor-type"
    ios:

  flavors:
    apple:
      app:
        name: "Apple App"

      android:
        applicationId: "com.example.apple"
        firebase:
          config: ".firebase/apple/google-services.json"

      ios:
        bundleId: "com.example.apple"
        firebase:
          config: ".firebase/apple/GoogleService-Info.plist"

    banana:
      app:
        name: "Banana App"

      android:
        applicationId: "com.example.banana"
        firebase:
          config: ".firebase/banana/google-services.json"
      ios:
        bundleId: "com.example.banana"
        firebase:
          config: ".firebase/banana/GoogleService-Info.plist"
Update Flavor:
after updating flavor you need to call the below command
flutter pub run flutter_flavorizr -p android:buildGradle,android:androidManifest