
First, we need to add the firebase-messaging dependency to the ./android/app/build.gardle file. In the file, we need to add the following dependencies:
dependencies {
    implementation "org.jetbrains.kotlin:kotlin-stdlib-jdk7:$kotlin_version"
    implementation 'com.google.firebase:firebase-messaging:20.1.0'
}
Next, we need to add an action and a category as an intent-filter within the activity tag in the ./android/app/src/main/AndroidManifest.xml file:
<intent-filter>
    <action android:name="FLUTTER_NOTIFICATION_CLICK" />
    <category android:name="android.intent.category.DEFAULT" />
</intent-filter>
Now, we need to create a Java file called Application.java in the path /android/app/src/main/java/<app-organization-path>.
Then, we need to add the code from the following code snippet inside it:
package io.flutter.plugins.pushNotification;import io.flutter.app.FlutterApplication;
import io.flutter.plugin.common.PluginRegistry;
import io.flutter.plugin.common.PluginRegistry.PluginRegistrantCallback;
import io.flutter.plugins.GeneratedPluginRegistrant;
import io.flutter.plugins.firebasemessaging.FirebaseMessagingPlugin;
import io.flutter.plugins.firebasemessaging.FlutterFirebaseMessagingService;public class Application extends FlutterApplication implements PluginRegistrantCallback {
    @Override
    public void onCreate() {
        super.onCreate();
        FlutterFirebaseMessagingService.setPluginRegistrant(this);
    }    @Override
    public void registerWith(PluginRegistry registry) {
        FirebaseMessagingPlugin.registerWith(registry.registrarFor("io.flutter.plugins.firebasemessaging.FirebaseMessagingPlugin"));
    }
}
Now, we need to assign this Application activity to the application the tag of the AndroidManifest.xml file as shown in the code snippet below:
<application
        android:name=".Application"
This completes our setup of the Firebase messaging plugin in the native Android code. Now, we’ll move on to the Flutter project.
Step 6: Install the Firebase Messaging Package
Here, we are going to use the [firebase_messaging] package, which you can find here. For that, we need to add the plugin to the dependency option of the pubspec.yaml file.
We need to add the following line of code to the dependencies option:
firebase_messaging: ^7.0.3Step 7: Implement a Simple UI Screen
Now, inside the MyHomePage stateful widget class of the main.dart file, we need to initialize the FirebaseMessaging instance and some constants as shown in the code snippet below:
String messageTitle = "Empty";
String notificationAlert = "alert";FirebaseMessaging _firebaseMessaging = FirebaseMessaging();
The messageTitle variable will receive the notification message title and notificationAlert will be assigned the action that's been completed once the notification comes up.
Now, we need to apply these variables to the build function inside the Scaffold widget body as shown in the code snippet below:
Widget build(BuildContext context) {
    return Scaffold(
      appBar: AppBar(
        title: Text(widget.title),
      ),
      body: Center(
        child: Column(
          mainAxisAlignment: MainAxisAlignment.center,
          children: <Widget>[
            Text(
              notificationAlert,
            ),
            Text(
              messageTitle,
              style: Theme.of(context).textTheme.headline4,
            ),
          ],
        ),
      ),
    );
  }
Next, we need to run the Flutter application by executing the following command in the project terminal:
flutter runWe will get the result you see in the image below:


For now, the notification title is empty, and the alert is also as defined. We need to assign a proper value to them once we receive the notification message.
So we need to configure the code to receive the notification and use the notification message to display it on the screen.
For that, we need to add the code from the following code snippet in the initiState function:
@override
  void initState() {
    // TODO: implement initState
    super.initState();    _firebaseMessaging.configure(
      onMessage: (message) async{
        setState(() {
          messageTitle = message["notification"]["title"];
          notificationAlert = "New Notification Alert";
        });      },
      onResume: (message) async{
        setState(() {
          messageTitle = message["data"]["title"];
          notificationAlert = "Application opened from Notification";
        });      },
    );
  }
Here, we have used the configure method provided by _firebaseMessaging instance which in turn provides the onMessage and onResume callbacks. These callbacks provide the notification message as a parameter. The message response will hold the notification object as a map object.
The onMessage function triggers when the notification is received while we are running the app. The onResume function triggers when we receive the notification alert in the device notification bar and opens the app through the push notification itself. In this case, the app can be running in the background or not running at all.
Now we are all equipped with the Flutter app. We just need to configure a message in Firebase Cloud Messaging and send it to the device.
Step 8: Create a Message from the Firebase Cloud Messaging Console
First, we need to go back to the Cloud Messaging console in the Firebase site as shown in the image below:


Here, we can see the ‘Send your first message’ option in the window, as we have not configured any messages before. We need to click on it which will lead us to the following window:


Here, we can enter the title, text, image, and name of the notification. The title we set here will be provided as the title in the message object on the callbacks we set before in the Flutter project.
After setting the required fields, we can click on ‘Next’ which will lead us to the following window:


Here, we need to provide our target app and click on ‘Next’.
For Scheduling we can keep the default option:


Next, the Conversion window will appear which we can keep as default as well, and then click on the ‘Next’ button.
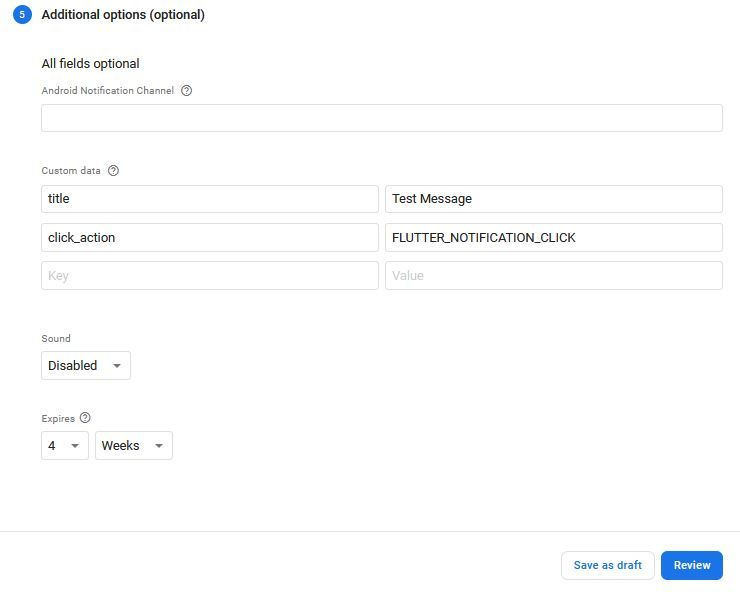
Lastly, a window where we need to enter the custom data will appear in which we can set the title and click_action. This click action event is triggered whenever we click on the notification that appears in the notification bar of the device.
After clicking on the notification message from the notification bar, the app will open and the onResume callback will trigger, setting title as assigned in the custom data in the screenshot below:

Now, we are ready to send the first notification message to the device. First, let’s try it with the device running in the emulator.
As we click on the ‘Review’ button and send the message, we will get the following result in the Cloud Messaging console as well as the emulator:

Here, we can see that the title and the notification alert on the emulator screen are updated as soon as we send a message from the console. We can be sure that the onMessage callback was triggered in the app after receiving the notification message.
Now let’s try with the app running in the background. As we send the message from the console, we will get the result as shown in the demo below:

Here, as soon as we send the message, we receive a push notification in the notification bar of the device. Then, as we drag down the notification bar, we can see the notification message title and text. And, by clicking on the notification message, we can launch the application and display the custom data on the screen. This ensures that our onResume callback was triggered.
And we’re done! We have successfully added a push notification feature in our Flutter application using Firebase Cloud Messaging.